Posts

Japanese Dreams – Bridge Card - Tutorial

Image
 This has got to be my favourite card i have made so far in my card making journey. It was so simple to make, but yet so effective What i used: White Card stock Red Card Stock Chinoiserie Chic Paper Collection Spectrum Noir Classique Alcohol Maker (DR1,FS6) Spectrum Noir Triblend Alcohol Markers (TB2, TB3, TB4) Double sided tape 3d Foam Pads 1           Trim white cardstock to 25 x 15cm, then score long side at 4cm, 8cm, 17cm and 21cm. Mountain fold outer score lines, valley fold inner ones. 2           Trim red card stock to cover the panels.  Should be 6 pieces. 4 pieces of 3 ½ x 14 ½ cm (side panels) 1 piece of 8 ½ x 14 ½ cm (back panel) 1 piece of 3 x 17 cm (bridge panel)   3           Trim the Umbrella paper.  Should be 4 pieces.  This is for the side panels.                   ...
Side Panel Fold Card - With Template

Image
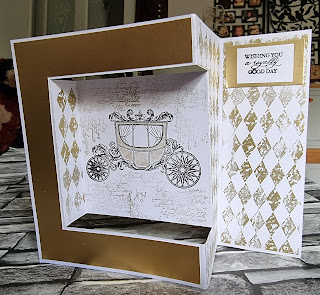
I wanted to make a fun fold card and made this super amazing side panel fold card. This one may look complicated but really it isn’t, all I would say is that precision is key for making this card.     The card fold is really different and very eye-catching with all the different sides and levels. The whole card folds flat and fits into a 5″ x 7″ envelope.   To make these cards I used: White stock cardstock. Gold cardstock Spectrum Noir Midas - Metallic Pigment Inkpad - Gold White cardstock (stamped in gold harlequin pattern) Indigo Blu – Jubilee Special Stamps Side Panel Fold Card Template   I have entered this card into:-   Addicted to stamps Simon says stamp The holly and ivy christmas challenge Alphabet Challenge TGIF Challenges Secret Stamper   Feel free to Visit the Blog | Follow on Pinterest | Follow on Facebook |  Follow on Twitter |Follow on Instagram Subscribe to Pretty Shabby UK

Super Easy Kit Kat Easter Cake

Image
Oh my goodness how cute is this cake.  Not only cute but super duper easy to make too.. Ingredients: your favourite cake your favourite icing Kit Kat bars (I bought 3 packs of 8 of the snack size) Sweetened coconut flakes (I used about 1/3 to 1/2 of a 14 oz. bag) Green food colouring Cadbury Mini Eggs ribbon Directions: 1. Bake your favourite cake recipe for a two-layer, 8" or 9" cake. (For this cake, I used Duncan Hines yellow cake mix.) Make sure to even out your layers so there's some room left at the top for your coconut. 2. Frost with your favourite icing. (For this cake, I used Duncan Hines chocolate icing.) 3. Press the Kit Kat bars around the cake gently. 4. Place the coconut in a zippered plastic bag. Add drops of green colouring (I used 4) and close the bag. Shake until the colour blends evenly. Add more colouring if necessary. 5. Sprinkle the coconut over the top of the cake. Add the mini eggs. 6. Tie a ribbon around the Kit Kat bars. inspir...

A Gorjuss Little Birdie

Image
Hi all, hope you are well. Here is another Gorjuss Girl card.  I know, i know i am so addicted to them.  I think she is super cute.  So yes, expect to see many many more of them over the next year or so. So i made this one using just scraps and stamps i had.  I know a £0 card... you cant get better than that. I got my inspiration from  The Card concept challenge #170  titled Wearing O' The Green.  I loved using this green i really think it brought out the colours.  I have to say - it looks a little ski-wiff from the photo..i didnt notice that whilst i was making it :( That aside - i love her.. and very very simple to make... I stamped the stamp on white stock card, coloured it in with my DecoTime Aqua Markers, i choose a cute little green themed outfit, well it is nearly St Patricks Day. This was set to one side to dry For the main body of the card, i cut the green stock card to the bottom of the scallops, i used a cute little white with matchi...

Shirt and Tie Birthday card

Image
Wow, this has been a long week.. I honestly cant wait until the weekend. I think it been boring this week, because my sciatic has kicked off again, and its too painful to do my usual weekly chores, so apart from the basics - i.e cleaning the kitchen and tidying round the living room. so i have been watching trashy murder dramas. and waiting for the kiddos and hubby to come home from work. I did make it to my card making class this week though :) We made this card this week at class.  This is the first male card i have made.  Its a very simple card to make.  I hope you enjoyed my sharing. Things I used: 6" x 6" inch card Bronze Stockcard Brown dogtooth stockcard Ivory pearlised stock card Black scrap from my stash silver scrap from my stash Pressed Shirt Die Dotty embossing folder I am sharing this on: Simon Says Stamp Addicted to Stamps Global Design Project Lawnfawnatics Feel free to Visit the Blog | Follow on Pinterest | Follow on Facebook |  Follow ...

Hand Printed Mothers Day Bouquet

Image
Here is a quick and simple gift you can make with the children for mothers day. These can be made up in a matter of minutes and they dry very quick too so you can make them and take them the same day! These bouquets are so easy to make, have your child put some paint on their hand, if you have more than one child then have each of them put a different coloured paint on their hands – maybe it’s best to do it one at a time, so there are not little paint prints all over the house 😊 Once they have paint on their hands put their hand print on the paper. Add some stems along with a little green ribbon bow. You can write your message on top once the children have finished their printing.   Also pop some little painted hearts in the background for some added interest. These would also look cute on a long piece of paper showing each handprint as single flowers in a field. If you don't have time to post these out for Mother's Day....take a picture and email or text your Mum a b...

Japanese Girl Birthday Card

Image
My daughter and her friends are into reading Manga and watching anime (the japanese graphic novels) and she loves all things Japanese at the moment - except sushi :) I decided to make her and her friends some birthday cards inspired by the Japanese theme, and i want to make each one slightly different, so i have to come up with at least 5 different design concepts.  Do you ever feel like your going to regret something? No, No i am sure it will be absolutely fine... I mean what can go wrong....right? Here is the first card I made in the Japanese theme. The construction of this card could not be any simpler. I found this lovely little Japanese them on Pinterest,  i coloured it in, cut it out - i dont have the correct measurements as i just eye balled it - thats the story of my life, no precision, im just a fly by the seat of your pants kind of girl :), then cut some Pink card to use as a mat to the image. I matched up some designer papers which i had in my stash, ok ok!... whe...

Teddy Bear Birthday Card

Image
There is something so cute about a teddy bear on a birthday card.  When i saw this stamp i thought it was so super cute with the flowers and balloon.  I guess you could use this for valentines day. Items I used: Yellow stock card from stash Red stock card from stash Designer papers from stash Deco Time Aqua Markers Image from Pinterest I am entering this in: Simon Says Stamp - Anything Goes http://casology.blogspot.com/ Addicted to Stamps # 423 Birthdays Feel free to Visit the Blog | Follow on Pinterest | Follow on Facebook |  Follow on Twitter |Follow on Instagram Subscribe to Pretty Shabby UK

Tulip Greeting Cards

Image
I made this card at my card group, so i don't know which company made the tulip die, sorry. When we got them the card, all the tulips and leaves where white.  I coloured the tulips with my deco aqua markers, I used three shades of pink for the flower heads and three shades of green for the leaves, for the bow I used the same colour as the darker shade of flower, to make it cohesive. I enjoyed making the card the card so much that i made another one, this time i used three shades of yellow and added glitter on a few of the outer parts of the tulip.  The leaves were coloured with the same three shades of green, and the bow was the same shade as the flower, again for coherence. The Items I used: 6" x 6" white card White die cut mat Blue die cut mat Tulip die cuts Deco Aqua Markers I will be sharing this with: Simon Says Stamp - Anything Goes Altenew Feel free to Visit the Blog | Follow on Pinterest | Follow on Facebook |  Follow on Twitter |Follow on Instagram ...

Quirky Birdy Card

Image
I found this image on line and it made me smile so much, I thought it would make a great birthday card for someone who's a little  quirky. DP - from stash Blue Chalk for background Colours - Deco aquamarkers Yellow and Orange stock card I am sharing this card on: Freshly Made Sketches All sorts challenge.blogspot.com Addicted to Stamps mftstamps #wsc582 Feel free to Visit the Blog | Follow on Pinterest | Follow on Facebook |  Follow on Twitter |Follow on Instagram Subscribe to Pretty Shabby UK

Tiny Kitchen Makeover

Image
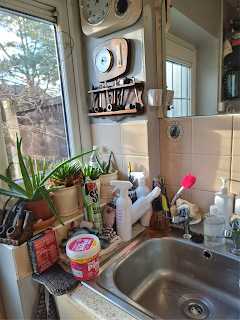
So my plans to keep blogging weekly with my handmade cards has unfortunately taken a back seat, because am also on a journey to de-clutter and decorate our 3 bedroomed home.  This week i have concentrated on the kitchen.   Over time, the kitchen got more and more cluttered.  It was becoming more and more frustrating when i opened a cupboard and things fell out. So i bit the bullet and went for it.   Please don't judge me on the before pictures.  I forgot to take them, and then when i did remember, there was more stuff piled on the side than there usually is. As you can see from the pictures we have a tiny galley style kitchen.  The kitchen units were beech coloured and tiles were a beige coloured.   The first thing i did was to wash the tiles thoroughly with sugar soap, this was to remove any dirt or grease, so that the paint would adhere to the tiles better. Using a roller to paint the tiles white.  I used wilkos own brand tile pa...

Birthday Fishes Birthday Card

Image
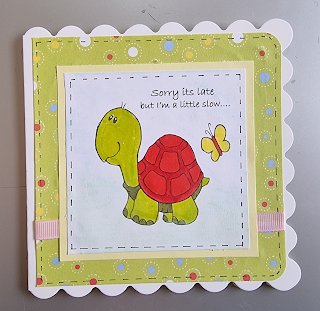
In our craft group, we have decided that we are going to make cards for each others birthday.  I love the idea of this, however it does not seem right to give a birthday card that we have made in class.   As I only had the list of birthdays for a couple of days, and the was three birthdays in January, two of which had already passed so i made this  belated birthday tortoise card .   After looking through  The card concept's  blog, I was totally struck by the latest design challenge. The colour of that hot chocolate and these berries, so i used that as my inspiration. I quickly pulled out my all time favourite stamps which are the Santoro Gorjuss girls (no i am not sponsored by them - I wish i was) and quickly got to work. I stamped the Little Fishes stamp on white stock card, coloured it in, i choice a cute little nautical  themed outfit. The sky and sea were highlighted it different shades of blue, and the majority was coloured in chalk, i...

Belated Birthday Tortoise Card

Image
Don't you just hate missing a birthday?  Usually I am so organised and haven't missed a birthday for a number of years (pats myself on the back) I joined a card making class in December and as a nicety, we all make each other a birthday card.  We got a list this week, but two of the ladies had already had their birthdays during the Christmas break, so i decided to make a belated birthday card for each. On the second one i Trimmed off the scallops, and left the designer papers square. Which do you like the best, scallops? or no scallops? What i Used 6" x 6" Scalloped Card Design Paper - From Stock Pink Ribbon Yellow Stock Card Blue Chalk (For background) Uniball Drawing Pel 0.3mm  DecoTime Aqua Markers I have entered this card into: Global design project Simon says stamp Feel free to Visit the Blog | Follow on Pinterest | Follow on Facebook |  Follow on Twitter |Follow on Instagram Subscribe to Pretty Shabby UK

Mermaid Kisses Card

Image
Hey there,  Oh wow, its only halfway through January and i have already slipped on my goals of posting here each week. I forgot to post this card last week, on our first week back to card making class. How cute is it.  This is definitely going to be for my Granddaughters birthday in April. Things I used: 6" x 6" Scallop White Card 5 1/4" x 5 1/14" Blue reflected Mirror Card 4 3/4" x 4 3/4" White Stock Card Blue chalk (for background) Mermaid Transparent Clear Stamp DecoTime Aqua Markers Feel free to Visit the Blog | Follow on Pinterest | Follow on Facebook |  Follow on Twitter |Follow on Instagram Subscribe to Pretty Shabby UK

A Floral Happy Birthday Card

Image
So we are well and truly back to the normal.  With that being said, it was craft class today.  We made a gorgeous little Happy Birthday Card. This card was so simple and so much fun to make. For the card I used:   White Cardstock Designer papers from my stash DecoTime Aqua Markers  Dies: from my stash White ribbon from my stash I have entered this card in: A perfect time to craft challenge ,  Global Design Project Feel free to Visit the Blog | Follow on Pinterest | Follow on Facebook |  Follow on Twitter |Follow on Instagram Subscribe to Pretty Shabby UK