Posts

Showing posts from June, 2012

CD Spindle Earring Stand - Tutorial

Image
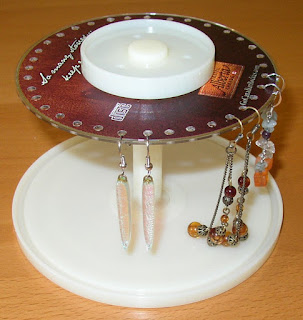
A very simple project to take the leftover stuff from a stack of blank CDs and make a stand to hold earrings. Step 1 - Find a suitable CD stack spindle The hardest part of this project is finding a suitable stack spindle.  This one had a stack of blank CDs stored on this spindle. There was also a plastic cover, but that did not come in useful for this project.  The spindle that held the blank CDs was quite nice, and the little plastic top that held the whole thing together screwed on nicely. Obviously this won't work with just any spindle without some ingenuity. Hopefully whatever you have lying around can be made to work. Step 2 - Drilling the CD Start with the CD - Using a Dremel cutting tool, or a drill. 1) Clamp the CD firmly to a piece of wood. The wood will have a few dozen tiny drill marks in it when you are done, so do it on a piece of scrap. 2) Wear eye protection, as the plastic bits from the CD fly around a lot 3) I just eyeballed the hole placement, but you cou

Upcycled Tv Unit

Image
If you read my post on  Lightening McQueen Bedroom on a Budget  you will notice in the corner of Luke's room there is a rather good looking TV stand :) This was not always the case. When my eldest lad moved out, I inherited this hideous looking TV stand,  There was some unsightly marks from the "fat screen" tv that was there previously I lightly sanded the unit down then I used my fantastic bargain buy, my Blue Melamine Paint which i stocked up on a few years ago (from Poundland) Not bad eh?  eventually we will put the TV up on Lukes Wall, I just wanted to make sure all the furniture worked in the space that I had put it into. Feel free to Visit the Blog | Follow on Pinterest | Follow on Facebook |  Follow on Twitter |Follow on Instagram Subscribe to Pretty Shabby UK

DIY Driftwood Tutorial

Image
Did you know that you can imitate nature? Kirsten from  Craftiments  was creating a summer mantle and needed some driftwood, but after searching she figured that the price of purchasing and the shipping cost was just too expensive. Luckily she has a background in chemistry, and was therefore able to use her knowledge to create this fantastic tutorial . Materials  - eye protection and rubber gloves - sticks and small logs that are at least partially dry - hammer, other tools that could be used for distressing the wood - Arm & Hammer Super Washing Soda ( MSDS ) - hot water - container large enough to hold the wood - wire brush - (optional) oven for drying the wood  -  sandpaper or sander power tool Now lets head over to  Kirsten at Craftiment s  for her amazing photographic step by step to turning regular looking wood in to amazingly beautiful drift wood. Feel free to Visit the Blog | Follow on Pinterest | Follow on Facebook |  Follow on Twit

Lightening McQueen Bunting/Banner

Image
My son Luke is crazy about Lightening McQueen, no word of a lie we watch Cars and Cars 2 at least once a day.  I am almost word perfect with the films. The banner was really simple to make. I started by cutting out 6 triangular pieces of brightly coloured card. I drew out a speech bubble for each of the characters using Microsoft Publisher. Cut these out, glued on to contrasting card scraps left over from the triangles and cut around the speech bubbles leaving about 5mm of card showing, to make a border and popped them to one side. I chose six of Luke’s favourite characters which were Lightening McQueen, Doc Hudson, Mater, Chick Hicks, Fred and Filmore.  These were printed onto white paper and cut out, glued on to the card scraps and put to one side. Once again, using Publisher to make their quotes I used different fonts and colours that complemented the characters.  I have to agree with Allison, it was fun trying to find fonts that fit the character

How to Make A Folding Chair

Image
How To Make a Folding Camp Chair I super excited to get to share another project tutorial with you. My last few projects have been so much fun to put together, it's nice to know that others think they're pretty okay too. My husband was even impressed with these chairs! Not because they turned out super cute or anything, but because they are "actually useful"-- silly boy! He has so much to learn about crafting... Let's get going, summer is here and there are camp outs to attend. First, hit the hardware store and gather your supplies. Here's what you'll need: **this is enough to make 2 chairs** WOOD: (2) 1" x 2" x 8' furring strips (4) 3/4" diameter x 48" poplar dowels  PAINT: 4' x 5' canvas drop cloth White primer/paint for legs Colors of your choice for designs on seats(when it came time to paint I ended up using spray paint on my seats, just a thought...)  HARDWARE:  (4) 1/4&quo

Personalised Canvas Wall Print for £1.00

Image
As i have mentioned so many times before, I am a hoarder. I decided to count my unused photo frames, and i have 47....  I decided that it was time that I did something with them. This frame I was lucky enough to buy 2 for 50p at a local car boot sale.  They were nice enough, but did not match any decor in my house. I love the French theme, but it just did not suit my house. The Frame was a little scratched. The back was made of brown paper (like the kind you send parcels in ) I got some beige paint and painted the frame (first I sanded it to smooth it, and enable the paint to stick). I love this picture of Luke on my Nieces Go-Kart, I love the colours. I printed it off on A4 Canvas that I bought in poundland for....you guessed it £1.00 I Parcel taped the back the canvas to the original front of the picture to ensure that it was held tightly, and fitted snugly into the frame, I am sure that there are neater way to do it, but t

Tuna Can Traffic Lights

Image
If you have visited my blog before you will be familiar with my love of recycling.  So when I decorated my sons   Lightening McQueen Bedroom  this was a perfect opportunity to recycle some tuna cans and a photo frame that I had. I found a frame that would comfortably fit 3 tuna cans inside.  Removed the glass, I will use this for another project no doubt.  I Painted the cans, frame and the back plate of the frame with black gloss. Whilst waiting for these to dry, cut circles out of red, yellow and green paper with my Big Shot (thank you hubby xx) I used a medium sided circle from the  X-cuts nesting dies, which fitted perfectly into the base of the can…..Honestly you would have thought they were designed especially for tuna can crafts hehehe…. Once the gloss had dried, I glued the card circles into the tuna cans so they did not fall out. I hot glued the back plate to the frame, then I glue

Basic Resin Casting

Image
There are many resins to use for crafting purposes.  For making jewellery such as the ones I featured in   Bottle cap pendant  and  Bottle cap bracelet , here are the basics...... Hope this is helpful to you,  Resins: Polyester Resin: is a liquid plastic that hardens when a few drops of the catalyst are added to create a chemical reaction. Polyester Resin is durable and is the resin of choice for industrial applications and serious crafters who are experienced in resin casting. This resin is highly toxic and should be used in a well ventilated area using protective masks to avoid inhalation. One main advantage of Polyester Resin is the depths in which it can be poured for larger embed projects. Polyester Resin is cheaper to buy than Epoxy resin as it is generally purchased in larger quantities such as 1lt + tins. Epoxy Resin: These resins are more frequently used in the crafting and hobby world, they are easy to use with a low toxicity, making them suitable f

The Sunshine Award

Image
I would like to say a HUGE BIG thank you to Evelyn from  My Turn  for awarding me with the Sunshine Award. The Sunshine Award is an award given by bloggers to other bloggers. The recipients of the Sunshine Award are: "Bloggers who positively and creatively inspire others in the blogoshere." The way the award works is this: Thank the person who gave you the award and link back to them. Answer 10 questions about yourself. Select 10 of your favorite bloggers, link their blogs to your post and let them know they have been awarded the Sunshine Award! Don't forget to copy and paste the award on your blog! Here we go! Ten questions: 1. Favorite color: Tricky, Black and Hot Pink.... 2. Favorite animal: My cat Mogwai (Mog), I love her to bits, she is such a princess.  I have had her since she was 6 weeks old, and she is nearly 7 now.... 3. Favorite number:11 (thats the date my fantastic husband and I met (11th July 2005) 4. Favorite drink: coffe

Refurbished Garden Furniture

Image
Andrea from Andrea's Attic found these chairs on Craigslist for $50. Wow! She must have seen their hidden potential, because I would have run the other way. Sure enough, they look awesome with a fresh coat of paint and new cushions. I also love the personalized Mr & Mrs pillows! Check out her blog: Andrea'sAttic,especially if you are considering painting wicker, as she offers some great tips. Tips that would have come in handy. Here is what they looked like at the previous owners house. They were beachy and bright and fun. They were cute, but not really my style. I googled "how to paint wicker" and found out that it was best to primer a couple coats and then use an oil based paint, not latex like I normally use. E was sweet enough to take care of the painting portion (he bought a new spray gun and likes to play with it) for me. I will tell you this much...I will never again hand paint anything that can be sprayed! That little gun is awesome (we go