Posts

Whitby Inspired Tag

Image
 Hi friends,  I hope you are keeping well.  Well,  I have to say that this week must have had wings on because it certainly flew by. I have had a week of non-stop crafting. I love it!!!!  I blitzed the house on Monday, so I just had oodles of time left for crafting, I definitely think that this is the way I am going to proceed in the future. It seems like the more I craft and create, the more INSPIRATION I have do you guys find this is how your inspiration works? So today I am sharing with you a cute little Halloween tag that I made.  Anyone who knows me knows that I LOVE HALLOWEEN!!! in fact, I think I prefer Halloween to Christmas!   Each Halloween we take a trip to Whitby in the UK.  For those who don't know, Whitby is the place that inspired Bram Stoker to write the AMAZING Dracula novel.  It's so beautiful and Gothic, and twice a year they hold a Gothic festival known as GothFest, where people dress up in all manner of wild and fan...

No One is watching, eat the Candy Tag

Image
Hello Friends, How are you doing today? I hope you are well! Today I am sharing with you a Halloween inspired tag. Supplies Used: Distress Ink Mowed Lawn Stamps: Tim Holtz - Halloween Doodles Alcohol Markers Spectrum Noir LB1, GY2, GY3 and LG3 I am entering this Tag into: Simon Says Stamp - Clean & Simple - #ssschallenge Color Throwdown - CTD756 Let's connect on Instagram Instagram Join my adventures on Pinterest | Come and say Hi on Facebook |  Subscribe to Pretty Shabby UK

Part of Your World Tag #GDP407

Image
Hello friends,  I know it's been such a long time since I popped on here, I am sorry,  I truly am. But what better way to come back to be "Part of Your World" than with this amazing little mermaid tag.  I love Arial, she is one of the best princesses that Disney has made, well that is in my opinion. Here she is in all of her glory. Supplies used: Inks & Oxides by Tim Holtz (Ranger inks) Mermaid Lagoon  Salty Ocean Chipped Sapphire  Dies Xcuts - Mermaid Xcuts - Crab I cant remember where I bought the bubbles die from. Alcohol Markers by Spectrum Noir I entered her as my entry for the:  Global Design Project #GDP407 the theme is water creatures. Paper Funday Challenge  #56 - Anything goes with the great outdoors Color Throwdown  #757 Do you have this die?  I would love to see what you have made with it.   Thank you for taking the time to stop and visit my blog.   Feel free to Visit the Blog | Follow on Pinterest ...

Easy Peasy Arrow Fold Card

Image
Hello,  Wow, what a hot week its been this week.  Here in the UK temperatures have soared to 40 degrees centigrade, i have never known it be so hot ever!!! Oh how very British of me talking about the weather :) My friends dog is pregnant, and is due to have her puppies on Monday, so i thought i would make her a card to celebrate the new arrivals. What I Used: Kraft card stock Designer paper  -  Its a Dogs Life Debbi Moore - Words of Inspiration Stamps Guillotine  Scoring board Pencil Glue Check out my  full tutorial  below to see how i made it Thank you for joining me here today, Have a great weekend Dawn xx Feel free to Visit the Blog | Follow on Pinterest  |Follow on Instagram Subscribe to Pretty Shabby UK

Triple Point Easel Card Tutorial

Image
Hi All,  I hope you are having a good week. My daughter is going for her first sleepover at her friends house tonight.  They have got a bell tent and there is about 10-15 girls sleeping over.  Oh how fun.  So she asked me to make her a card for the Birthday Girl, she loves cats. I decided to make her this Triple Point Easel card, 1 because its SOOO easy to do, and 2 because I had the perfect stamp in mind. How adorable are the little baking kittens and it folds down flat to fit into a 6" x 6" envelope What I Used: White card stock Designer paper  - from my stash Pink Card stock Your so Sweet Stamp Set  DecoTime Alcohol Markers Guillotine  Scoring board Pencil Glue Check out my full tutorial below to see how i made it Feel free to Visit the Blog | Follow on Pinterest | Follow on Facebook |  Follow on Twitter |Follow on Instagram Subscribe to Pretty Shabby UK

Easy Slide and Reveal Steampunk Card Tutorial

Image
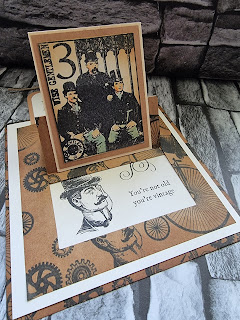
Hi,  Wow, can't believe that its Friday already, this week has flown by so quickly, i guess this has something to do with my friend and i going, numerous times, to a huge craft sale in our local art and craft shop. We got some amazing goodies, they were selling dies for £3 and stamps for 20p, we bagged ourselves huge bargains. Anyway, on to the card. Today i am sharing with you my Steampunk themed slide and reveal card.     It looks so effective and fancy, however it is so simple to make. You will need: Kraft cardstock           5 3/4" x 5 3/4"                                            5" x 5"                                           4" x 4 1/2" Cream cardstock        5 ...

Shadow Box Beach Themed Card Tutorial

Image
Hi, Hope you are all doing well today. I am delighted to say that i have been chosen as a guest designer for the  Paper Funday Challenge .  This month the challenge was "A day at the beach".  You know when you have that sudden flash of inspiration, well this card was mine, as soon as i thought beach i thought of my beautiful fairy mermaid stamp.  This stamp i found at a car boot sale quite a while ago, i'm sorry I don't know who it is by, but isn't she just adorable. You will need: Navy card stock measuring 9 6/8" by 5 6/8" Mat layers measuring 4" by 5 1/2" (4 of these) and  7/8" by 5 1/2" (2 of these) Designer papers measuring 3 6/8 by 5 1/4" (4 of these) and 6/8" by 5 1/4" (2 of these) 4" by 5 1/4" (1 of these) White card stock measuring 7" by 4" (2 of these) and 7 by 5 1/4" (2 of these) Coordinating ribbon 7 1/2" (2 pieces) 1) Make the cover using the Navy card stock and score at 4 3/...

Showers of Love

Image
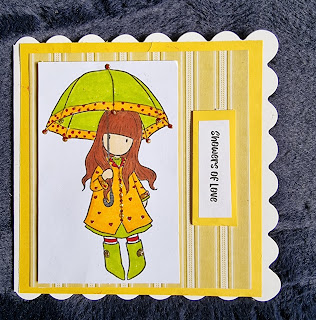
Good Morning All,  If your in the UK this morning, you will be able appreciate this card this morning.  For those who aren't let me tell you, it is torrential rain, and its so dark that it looks like evening time. So, showers of love seemed so apt for today's card. What you will need:- 6" x 6" card blank 5 3/4" x 5 3/4" yellow card stock 5 1/2" x 51/2" yellow and white striped designer paper (from stash) Santoro - Stamp "Puddle of Love" Decotime - Aqua Markers White Card stock Cut to size. I have shared with the following:- Color Throwdown - CTD#698 My Favourite Things I hope you enjoyed the card today.  Let me know what you think in the comments below. Feel free to Visit the Blog | Follow on Pinterest | Follow on Facebook |  Follow on Twitter |Follow on Instagram Subscribe to Pretty Shabby UK

Origami Shadow Box Fold Card Tutorial

Image
Hi, I hope you are all well. I was looking for an unusual card to do for my turn at card class.  I came across this card.  Its another very simple and easy to make card, but i think it looks very effective. 1         Cut the paper to the following sizes: Plain Lilac Paper – 5 ½” x 5 ½”          Single Side Spotty Paper – 5 ¼” x 5 ¼ “ Single sided Flower Pattern – 5” x 5” Double sided Flower Paper – 5 ¼” x 5 ¼” 2           Mat and layer the papers, 1 st Plain, 2 nd Spotty and 3 rd Floral single sided. 3           Using the double-sided piece – (floral side up), mark the centre of the paper. 4           Fold the corner points to touch the centre point, so there should only be the spotty paper seen.  5           Once all the corners have been folded in,...

Feathered With Sympathy Card

Image
I very rarely get to make sympathy cards, but when I saw this feather stamp, which came free with the latest edition of simply card and papercraft, I knew I had to make one. It's one of those cards that are very simple to make, but very effective. I used: Black card Gold card Fabulous Feathers Stamps (simply papercraft and card making freebie) Double sided sticky tape 3d foam tape Gold heat embossing power Embossing ink pad Heat gun First I cut a 5x7" card base from the black card, then cut a piece of gold cardstock that measured 4 1/2 x 6 1/2" and adhered itfor a mat. I cut a piece of black card 4 x 6# and stamped the feather design, I made sure that the feather went in different directions and some over hung the page, it gives a fluttering effect, heat seat the embossing powder. Adhere that to the gold card. I then stamped a piece of black card with the sentiment With Sympathy and heat embossed it, mounted onto a piece of gold card and attached to the card. Voila, si...

Cardmaking Templates

Image
Cardmaking Templates Creating a particular cardmaking template can help you to make some really stunning cards plus it will serve as a reminder for you when you need to make it again. Not only do templates help you to see the required measurements but it allows you to build up your confidence as you make them. They don't need to be fancy and you don't need to be able to draw either (phew, because I am really really bad at drawing).  So give it a try, I promise you it will be worth it. Tips Use some of your old scraps or card, if your like me, there will be loads knocking around Make all your lines and instructions clear and bold, so that you will see what you need to follow Store them safely in a folder to be re-used again and again whenever you need them.  I find this particularly useful if it has been some time since I did a project, and need a little refresher on what to do.     This beautiful Japanese Dream Bridge Card   has been c...

Japanese Dreams – Bridge Card - Tutorial

Image
 This has got to be my favourite card i have made so far in my card making journey. It was so simple to make, but yet so effective What i used: White Card stock Red Card Stock Chinoiserie Chic Paper Collection Spectrum Noir Classique Alcohol Maker (DR1,FS6) Spectrum Noir Triblend Alcohol Markers (TB2, TB3, TB4) Double sided tape 3d Foam Pads 1           Trim white cardstock to 25 x 15cm, then score long side at 4cm, 8cm, 17cm and 21cm. Mountain fold outer score lines, valley fold inner ones. 2           Trim red card stock to cover the panels.  Should be 6 pieces. 4 pieces of 3 ½ x 14 ½ cm (side panels) 1 piece of 8 ½ x 14 ½ cm (back panel) 1 piece of 3 x 17 cm (bridge panel)   3           Trim the Umbrella paper.  Should be 4 pieces.  This is for the side panels.                   ...