Pinecone Topiary Tree Tutorial

Infusing natural rustic decor into your holiday decor creates a casually elegant style that is warm and welcoming. Pinecone Topiary Trees do just that, emphasizing materials such as pinecones that can be found right in your own back yard.

2-12" Foam cones
Hot Glue Gun
Mod Podge
Burnt Umber Craft Paint
Gold Spray Paint
Glitter in White Gold
Heavy Duty Scissors
Paint Brush
Pine cones
Mist each pinecone with gold spray paint, not total
coverage, just enough to give them a little metallic sparkle.
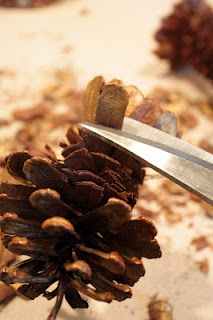
Once the gold paint dried, cut the ‘petals’ off of three
medium (6″) size pinecones. Using heavy
duty scissors, cut off all the petals and set them aside. It might look
difficult, but I promise, it is really easy.
Next, paint the Foam cone with burnt umber craft paint and
let dry. (This is so you don’t have any white peeking out from in between the
petals.)

Once your Foam cone is dry, it’s time to start gluing the petals on. This process went really quickly. Don’t waste your time gluing each petal on one, by one, go ahead and run a line of glue and line the petals up side by side. Do not worry about the cut ends being perfectly straight, the ends will be covered by the next row.

Keep gluing the petals on, in an over-lapping brick pattern. See how the gold paint gives it just a little bit of light?


Once you have covered the entire Foam cone with petals, now it is time to add a little glitter.

Using a paint brush, lightly brush Mod Podge on the petals. Do as much or as little as you’d like.

Sprinkle glitter on the wet Mod Podge, and knock off excess. The glitter really adds a finishing touch and really. Its easier to work around the topiary, row by row, the Mod Podge dries too quickly to try to cover the whole thing, so just work in sections.

Once everything has dried, you have created beautiful Pinecone Topiaries! They look beautiful alone, don’t you just adore the rustic, woodland feel of them and love the added sparkle!


I do like that idea. We have a tree at the bottom of next doors garden loaded with the long cones. Look out, here I come.
ReplyDelete