Posts

Showing posts with the label tutorial

Triple Point Easel Card Tutorial

Image
Hi All,  I hope you are having a good week. My daughter is going for her first sleepover at her friends house tonight.  They have got a bell tent and there is about 10-15 girls sleeping over.  Oh how fun.  So she asked me to make her a card for the Birthday Girl, she loves cats. I decided to make her this Triple Point Easel card, 1 because its SOOO easy to do, and 2 because I had the perfect stamp in mind. How adorable are the little baking kittens and it folds down flat to fit into a 6" x 6" envelope What I Used: White card stock Designer paper  - from my stash Pink Card stock Your so Sweet Stamp Set  DecoTime Alcohol Markers Guillotine  Scoring board Pencil Glue Check out my full tutorial below to see how i made it Feel free to Visit the Blog | Follow on Pinterest | Follow on Facebook |  Follow on Twitter |Follow on Instagram Subscribe to Pretty Shabby UK
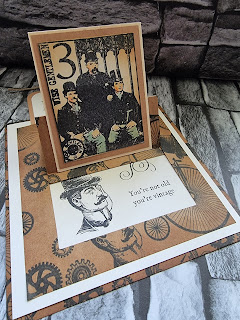
Easy Slide and Reveal Steampunk Card Tutorial

Image
Hi,  Wow, can't believe that its Friday already, this week has flown by so quickly, i guess this has something to do with my friend and i going, numerous times, to a huge craft sale in our local art and craft shop. We got some amazing goodies, they were selling dies for £3 and stamps for 20p, we bagged ourselves huge bargains. Anyway, on to the card. Today i am sharing with you my Steampunk themed slide and reveal card.     It looks so effective and fancy, however it is so simple to make. You will need: Kraft cardstock           5 3/4" x 5 3/4"                                            5" x 5"                                           4" x 4 1/2" Cream cardstock        5 ...

Shadow Box Beach Themed Card Tutorial

Image
Hi, Hope you are all doing well today. I am delighted to say that i have been chosen as a guest designer for the  Paper Funday Challenge .  This month the challenge was "A day at the beach".  You know when you have that sudden flash of inspiration, well this card was mine, as soon as i thought beach i thought of my beautiful fairy mermaid stamp.  This stamp i found at a car boot sale quite a while ago, i'm sorry I don't know who it is by, but isn't she just adorable. You will need: Navy card stock measuring 9 6/8" by 5 6/8" Mat layers measuring 4" by 5 1/2" (4 of these) and  7/8" by 5 1/2" (2 of these) Designer papers measuring 3 6/8 by 5 1/4" (4 of these) and 6/8" by 5 1/4" (2 of these) 4" by 5 1/4" (1 of these) White card stock measuring 7" by 4" (2 of these) and 7 by 5 1/4" (2 of these) Coordinating ribbon 7 1/2" (2 pieces) 1) Make the cover using the Navy card stock and score at 4 3/...

Origami Shadow Box Fold Card Tutorial

Image
Hi, I hope you are all well. I was looking for an unusual card to do for my turn at card class.  I came across this card.  Its another very simple and easy to make card, but i think it looks very effective. 1         Cut the paper to the following sizes: Plain Lilac Paper – 5 ½” x 5 ½”          Single Side Spotty Paper – 5 ¼” x 5 ¼ “ Single sided Flower Pattern – 5” x 5” Double sided Flower Paper – 5 ¼” x 5 ¼” 2           Mat and layer the papers, 1 st Plain, 2 nd Spotty and 3 rd Floral single sided. 3           Using the double-sided piece – (floral side up), mark the centre of the paper. 4           Fold the corner points to touch the centre point, so there should only be the spotty paper seen.  5           Once all the corners have been folded in,...

Japanese Dreams – Bridge Card - Tutorial

Image
 This has got to be my favourite card i have made so far in my card making journey. It was so simple to make, but yet so effective What i used: White Card stock Red Card Stock Chinoiserie Chic Paper Collection Spectrum Noir Classique Alcohol Maker (DR1,FS6) Spectrum Noir Triblend Alcohol Markers (TB2, TB3, TB4) Double sided tape 3d Foam Pads 1           Trim white cardstock to 25 x 15cm, then score long side at 4cm, 8cm, 17cm and 21cm. Mountain fold outer score lines, valley fold inner ones. 2           Trim red card stock to cover the panels.  Should be 6 pieces. 4 pieces of 3 ½ x 14 ½ cm (side panels) 1 piece of 8 ½ x 14 ½ cm (back panel) 1 piece of 3 x 17 cm (bridge panel)   3           Trim the Umbrella paper.  Should be 4 pieces.  This is for the side panels.                   ...

Amazing Mrs Claus Apron - Tutorial

Image
Does the thought of preparing Christmas lunch bored you?  Well try serving it in this easy to make little Christmas number. The Mrs Claus Apron is so simple to make, and you have to admit, it is so cute too. Dont forget to pop over an have a look at the adorable  Pinecone carollers  or my  Top 10 christmas wreaths

Christmas Decorations Round Up

Image
Here is a quick collection of my favourite Christmas decorations with tutorials so far this year :)   Hope you enjoy them Dogs Paw Print Domino Christmas Ornament Christmas Tree Vintage Window Microscope Slide Ornaments Paperback Christmas Tree Doily Star Paper Decor Baubles Seed Bead Bauble Wood, Drill and Yarn Ornament Origami Ornaments Pet Photo With Paw Prints Handmade Christmas Stackable Origami Bulldogs and Argyle

DIY Light Box Tutorial

Image
Good close up photography requires good lighting. The lighting that is needed to provide the product to be shown to its best colour and detail is difficult to achieve. A light box is the perfect solution to this. The lightbox provides light diffusion and a uniform background to your project. Unfortunately they can be expensive, but as you know if there is a frugal option, I will find it. Materials Cardboard box (Yes i used an old nappy box) Tracing Paper Few sheets of white card/paper Ruler Cutting knife Sticky Tape Lightening for the box (ideally clip on table type) Step 1 Choose a box the appropriate size for the project you want to photograph. You could make a number of different sized boxes for different sized projects. My box was a nappy box box from the gruesome twosome. Step 2 Make sure the bottom of the box is securely fastened before you start to cut the sides. Step 3 If your box has flaps, cut these off. Step 4 Mark the inside of the box with lines about 1 inch (2.5...

Lightening McQueen Bunting/Banner

Image
My son Luke is crazy about Lightening McQueen, no word of a lie we watch Cars and Cars 2 at least once a day.  I am almost word perfect with the films. The banner was really simple to make. I started by cutting out 6 triangular pieces of brightly coloured card. I drew out a speech bubble for each of the characters using Microsoft Publisher. Cut these out, glued on to contrasting card scraps left over from the triangles and cut around the speech bubbles leaving about 5mm of card showing, to make a border and popped them to one side. I chose six of Luke’s favourite characters which were Lightening McQueen, Doc Hudson, Mater, Chick Hicks, Fred and Filmore.  These were printed onto white paper and cut out, glued on to the card scraps and put to one side. Once again, using Publisher to make their quotes I used different fonts and colours that complemented the characters.  I have to agree with Allison, it was fun trying to find fonts that fit th...

Personalised Canvas Wall Print for £1.00

Image
As i have mentioned so many times before, I am a hoarder. I decided to count my unused photo frames, and i have 47....  I decided that it was time that I did something with them. This frame I was lucky enough to buy 2 for 50p at a local car boot sale.  They were nice enough, but did not match any decor in my house. I love the French theme, but it just did not suit my house. The Frame was a little scratched. The back was made of brown paper (like the kind you send parcels in ) I got some beige paint and painted the frame (first I sanded it to smooth it, and enable the paint to stick). I love this picture of Luke on my Nieces Go-Kart, I love the colours. I printed it off on A4 Canvas that I bought in poundland for....you guessed it £1.00 I Parcel taped the back the canvas to the original front of the picture to ensure that it was held tightly, and fitted snugly into the frame, I am sure that there are neater way t...