Posts

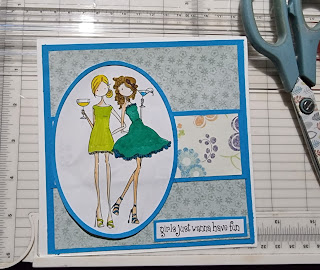
Girls just wanna have fun card
Image
How gorgeous is this peacock teal Cardstock.  I absolutely love this colour. It was this cardstock that set the whole colour scheme for this card. For the card I used:   Teal card stock from HobbyWorld Designer papers from my stash DecoTime Aqua Markers  Stamps:  Bella Stamping - Girls just wanna have fun stamps I have entered this card in: Simon Says Stamp challenge ,   Allsorts Challenge ,  A perfect time to craft challenge ,  Global Design Project My Favourite Things #Msc582 Feel free to Visit the Blog | Follow on Pinterest | Follow on Facebook |  Follow on Twitter |Follow on Instagram Subscribe to Pretty Shabby UK
My Goals for 2022

Image
Is it too early to start talking about 2022 goals?  No, of course not.  Goals are very important, and to be honest since the lockdown in 2020, I have been lacking in goals, and just somehow seemed to have drifted through 2021, with no motivation, no structure and I seem to have just wasted the year and achieved nothing. So my first goal is to set some goals :) No seriously, my first goal was to spend some time working on my blog, its been far far to long since i connected with your all. I have missed you, have you felt the same? One of my goals for 2022 is i want to start making and giving everyone handmade cards throughout the year.  Although i have made some interesting cards, i have never really had the courage to give them out for the special occasions they were made for. Its that wonderful sense of Self-doubt took over, you know the monster that creeps into your mind saying, "you should have done this" "or that", and "it would look so much better if you...

Sequin Christmas Tree Decorations

Image
Are you looking for a little something different for your tree, maybe you would like to give someone a homemade decoration?  I think these sequin Christmas baubles are so stunning. What you will need: Foam Balls Sequins ( Peacock ball - Turquoise, Royal, Purple and Gold) Acrylic Paint (to cover the white foam) Sequin Pins Directions: Use the pins to fix the sequins to the Styrofoam ball. Continue until all the ball is covered with sequins. Add a hook on the ball. There is no limit to what you can decorate.  If your decorating with the kids, why not try using stars. If you have some spare time, why not plan out a pattern. You could also try using tiny sequins The possibilities are endless, and the only limit is your imagination. I would love to see what you create   Feel free to Visit the  Blog  | Follow on  Pinterest  | Follow on  Facebook  |  Follow on  Twitter  |Follow on  Instagram Subscribe to  Pretty Shabby UK ...

Joy and Noel Ornaments

Image
I love making Christmas Decorations for our tree.  Dont you think that a tree filled with Christmas decorations that you have made yourself is simply delightful? Here is a super simple way of creating some bespoke but super simple ornaments What you'll need: Scalloped shape cur from card stock   Glitter  - Brown and Silver (or any colour of your choice)  Chipboard letters Narrow Ribbon Mod Podge Paint Brush Scrap booking paper Cardboard Glue Gun First, glitter the edges of the card stock brown glitter and Mod Podge.  You can use any colour of glitter that you want.  How nice does the scallops stand out with the glitter? Cut a circle of coordinating paper and glue in centre of the scalloped cardstock.   Select what letters you want to use and glitter with silver glitter. You can mix up the fonts to add a little interest. This is a great way to use up some of the odd ball letters you might have, doesn't matter the shape...

Acorn Caps Christmas Ornament

Image
I love nature, and I love being able to bring nature into my crafts especially around Christmas time. So today i am going to show you how to make a super cute and easy way to use Acorn caps to make a Christmas Ornament. Here is what you will need: Acorn caps Burnt Umber craft paint (and brush) 3" Styrofoam ball Jute twine Small piece of floral wire (18 gauge) Narrow ribbon Silver glitter (or your choice of color) Mod Podge Hot glue gun First paint the styrofoam ball with burnt umber, this is just so you don't see the white of the foam. You could find a closer match to the color of the acorns if you want, burnt umber is what I had on hand . Next start pushing the caps into the foam. Hot glue might be necessary for this part. While a lot of them stayed pretty well some of them were a bit too, so i decided to put a little dab of glue in the indention and stick the cap back on. Get the caps as close as you can to each other and work your way all the way around. Do not try to ge...

Santa Paws is coming to town

Image
This card is purr...fect for the cat lover at christmas. For the card I used:   Baby blue card stock from my stash Baby blue paper from my stash Christmas lights image that i printed DecoTime Aqua Markers Stampin Up  - Sweet Little Stocking stamps I have entered this card in the  Addicted to Stamps Challenge #420 Feel free to Visit the Blog | Follow on Pinterest | Follow on Facebook |  Follow on Twitter |Follow on Instagram Subscribe to Pretty Shabby UK

Quick and Easy Birthday Card

Image
Do you want to create a handmade card, but just don't have the time to get all of your supplies out?  Lacking the creative mojo of cardmaking?  Well this card could not be quicker or easier to make. Instructions: Start with a red card stock base Cut a piece of white card stock 1" shorter than the red card base. Cut out a red, pink and green circle Stamp out a Sentiment and trim to size and round corners Cut a piece of red card stock 1/2" larger than the sentiment, and round corners. Glue the circles down, and draw balloon knots with corresponding colours.  join the balloons with grey coloured string drawing. Attach sentiment. I am entering this card in the following Challenges:   Global Design Project #322 The Colour Throwdown #673 If you wanted to take the card to the next level, you could emboss the balloons and white card stock or use ribbon/string instead of drawing the string. I hope this simple card has given you some inspiration.   Feel f...

New Home Card

Image
After helping my son move home this weekend, I thought I would treat myself to a little quiet craft time.  I thought I would kill two birds with one stone and create a card especially for him. My card features a cute little stamp set called Memory Lane Houses from Crafty Individuals, which I coloured in with pencils.  The sentiment was from Shutterstock and the design paper was from Moonlight Magic paper pack from Make and Create. I followed along with this layout from  Freshly Made Sketches   I am also entering my card in: Lil Red Wagon Challenge - NBUS #630 Feel free to Visit the Blog | Follow on Pinterest | Follow on Facebook |  Follow on Twitter |Follow on Instagram Subscribe to Pretty Shabby UK

Beaded Picnic Utensils

Image
If you love easy summer crafts then you'll love these Wire Wrapped and Beaded Picnic Utensils from Candace . This project is perfect for a summer Materials: Plastic flatware 18 gauge wire – 8″ per flatware piece Assorted beads Focal bead Instructions: Make a sma ll spiral in one end of the wire.   Think of the smallest part of the spiral as  the centre of the handle. Make a bead trap by creating a sharp bend away from the centre, sliding on a bead and bending the wire sharply back toward the centre.   Pin the spiral at the  top of the handle with your thumb as you wrap the wire around the handle. Slide on a bead.   Trap the bead with a sharp bend away from the center.Bend the wire to the center and slide on your focal bead.   Wrap the wire around the handle, slide a bead on and trap it with a sharp bend away from the center. Wrap the remaining wire into a spiral and center it.The wire will slide off easily t...

Fig and Fudge Biscuits

Image
These biscuits can easily be made by kids with only a little grown-up help, and they're deliciously crunchy. My kids love to make these, and they are popular when it comes to a mothers day or fathers day treats for the grandparents. Ingredients 60g/2¼oz plain flour 40g/1¾oz butter, softened 1 ready-to-eat dried fig 20g/1oz caster sugar 1 tbsp chopped fudge   Method Preheat the oven to 180C/350/Gas 4. Place a sheet of baking paper onto a baking tray. Put the flour and butter into a mixing bowl and rub the two together to make a crumbly mixture. Snip the stalk off the dried fig then cut the fruit into small pieces using the scissors. Add to the bowl with the sugar and the fudge pieces. Use your hands to start to squeeze it all together – you can push down with your knuckles into the bowl. As it starts to make a lump, turn the bowl out onto the work surface and continue squeezing to make a long, fat sausage shape.   Tear the m...

Whatever you like sauce recipe

Image
So versatile! This recipe is also delicious if you have any left-over meat or sausage, which can be added to the sauce, to heat thoroughly. It is also delicious over pasta with cheese grated over, or if you are feeling extravagant with Goats cheese. Serves:   4 People Prep Time: 10 minutes Cook Time: 40 minutes Ingredients: 1 large onion chopped Tin chopped tomatoes or fresh if you have a glut from the garden cloves of garlic crushed 2 courgettes chopped small 1 green pepper chopped into small pieces 1 teaspoon dried mixed herbs 1 teaspoon smoked Paprika Step by step: Fry the onion (and Chorizo if using) until it starts to soften. Add the rest of the ingredients for the sauce except for the tomatoes. Cook until softened on a lowish heat. Now add the tomatoes and then fill empty tin up with water and add the water to the pan. Bring to the boi...

Plum and chocolate bread and butter pudding recipe

Image
A wickedly delicious dessert with that ‘feel good factor’ that makes any meal special.  A great recipe for Valentine’s Day! Serves:    2 People Prep Time: 15 minutes Cook Time: 40 minutes Ingredients 3 slices of stale bread Spreading of butter or spread 2 eggs 2 teaspoons of sugar 150ml carton (small) of single cream 6 dark ripe plums 100g bar of dark chocolate Method Pre-heat the oven to 160°C. Butter the slices of bread on one side and cut into fingers. Grate the chocolate. Stone and cut up the plums and stew them for about 10 minutes until soft in a little water. Arrange layers of bread, chocolate and plumbs in a medium dish until it is full. In a jug beat up the egg, add sugar and milk slowly and stir in the cream last. Pour the mixture over the bread and leave to soak for 5 minutes. Sprinkle with a little more chocolate. Pop i...