DIY Light Box Tutorial
Good close up photography requires good lighting. The lighting that is needed to provide the product to be shown to its best colour and detail is difficult to achieve. A light box is the perfect solution to this. The lightbox provides light diffusion and a uniform background to your project.
Unfortunately they can be expensive, but as you know if there is a frugal option, I will find it.

Materials
Cardboard box (Yes i used an old nappy box)
Tracing Paper
Few sheets of white card/paper
Ruler
Cutting knife
Sticky Tape
Lightening for the box (ideally clip on table type)
Step 1 Choose a box the appropriate size for the project you want to photograph. You could make a number of different sized boxes for different sized projects. My box was a nappy box box from the gruesome twosome.
Step 2 Make sure the bottom of the box is securely fastened before you start to cut the sides.
Step 3 If your box has flaps, cut these off.

Step 4 Mark the inside of the box with lines about 1 inch (2.5 cm) from the edge of the box on each side and the top of the box. Tip, if you use a standard 12" (30 cm ) ruler this is the perfect width.

Step 5 Using the cutting knife, carefully cut along the lines inside the box. Don't worry if your cuts are not perfectly straight, this is not too important. Your box should look like the picture above
Step 6 Cut the card to fit the inside of the box. The piece should be the same width as the box, but the length should be twice the length, to ensure you don't get crease marks when you take the photo.

Step 7 Cut the tracing paper so that it is large enough to fit the openings that you cut from the box. Tape the tracing paper to the outside of the box.

Step 8 Repeat Step 7 until all the sides and top of the box are covered.

Step 9 Next set up the lighting, I bought fabulous clip on lights from IKEA that were really cheap
Tip: Start with one layer of tracing paper, take some test shots, if necessary further pieces can be added to achieve the right lighting.
Hope you find this tutorial helpful, and I would love to see your photos if you make it.
Few sheets of white card/paper
Ruler
Cutting knife
Sticky Tape
Lightening for the box (ideally clip on table type)
Step 1 Choose a box the appropriate size for the project you want to photograph. You could make a number of different sized boxes for different sized projects. My box was a nappy box box from the gruesome twosome.
Step 2 Make sure the bottom of the box is securely fastened before you start to cut the sides.
Step 3 If your box has flaps, cut these off.
Step 4 Mark the inside of the box with lines about 1 inch (2.5 cm) from the edge of the box on each side and the top of the box. Tip, if you use a standard 12" (30 cm ) ruler this is the perfect width.

Step 5 Using the cutting knife, carefully cut along the lines inside the box. Don't worry if your cuts are not perfectly straight, this is not too important. Your box should look like the picture above
Step 6 Cut the card to fit the inside of the box. The piece should be the same width as the box, but the length should be twice the length, to ensure you don't get crease marks when you take the photo.

View from inside the box
Step 7 Cut the tracing paper so that it is large enough to fit the openings that you cut from the box. Tape the tracing paper to the outside of the box.

View from outside the box
Step 8 Repeat Step 7 until all the sides and top of the box are covered.
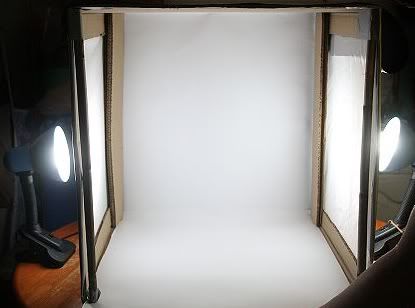
Step 9 Next set up the lighting, I bought fabulous clip on lights from IKEA that were really cheap
Tip: Start with one layer of tracing paper, take some test shots, if necessary further pieces can be added to achieve the right lighting.
Hope you find this tutorial helpful, and I would love to see your photos if you make it.


Comments
Post a Comment
Hi, I love to hear your views good, bad and even ugly... If you like something let me know so i can do more of it, if not, i will try and do less. Thank you SO MUCH for taking the time to comment, I really enjoy reading what you think about the blog xx