Posts

Showing posts with the label painted

DIY Milk Paint Recipe

Image
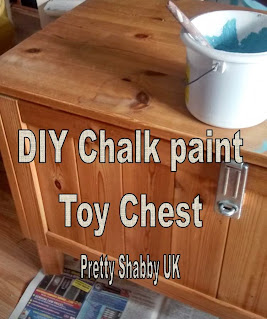
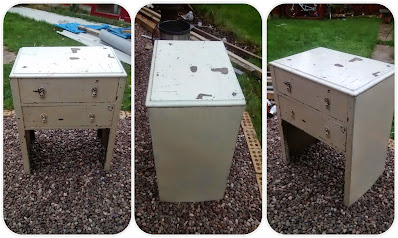
After the outstanding results I received with the DIY CHALK PAINT , if you read my sideboard , rocking chair or toy chest posts, you will have seen the amazing results that the chalk paint made. So this time  i thought i would test out a milk paint recipe What you need: 4 parts milk powder 1 part bicarbonate of soda 1 part pigment 6 parts cold water Patience  The method is pretty simply. All you need to do is mix the milk, bicarbonate of soda and pigment powders together then add the water and stir well. Leave the paint to sit for 1 hour then stir again and paint. (I know, i know you probably will want to get painting you project, but if you can wait – you will get better outcomes - try watching an episode of  Once Upon a Time... oh lord, my sister and i are addicted) The milk paint dries quickly so once you’ve started using it and be careful not go back over areas, as you can wipe the paint back off. Even though it is touch dry in about 15 min...

Chalk Painted Toy Chest

Image
Since learning how to make  Chalk Paint  i have become obsessed by painting everything LOL.. If its wooden/old/boring or ugly it get the Chalk Paint treatment. My sister bought me this chest for my birthday last year, i loved it, but i could see more potential to it. So i made up the paint as the  Recipe  states and got to work. The paint looks a little more shocking on the above picture, it really was not that bright in real life. I left it to dry and put a second coat on. Via EBay i found a lovely vinyl saying which would be perfect. So here she is..... I think its amazing, and i love it, not only does it look fabulous, but it hides all the kids clutter. Feel free to Visit the Blog | Follow on Pinterest | Follow on Facebook |  Follow on Twitter |Follow on Instagram Subscribe to Pretty Shabby UK

Chalk Paint Side Board

Image
I have been wanting , no NEEDING a sideboard for months.  I have looked everywhere for a nice one, but alas, nothing (well, within my price range anyway). When i found one on EBay that was only a few miles away i jumped at it.... well you have to don't you. And here she is: I have to apologise for the picture, i always seem to jump in to the decorating before taking photos of the before..... So I picked this up for £30.00, as you can see it had a scorch mark on the top, a few scratches here and there, but that did not matter.  I loved her. I mixed up a batch of my  Homemade chalk paint .. recipe can be found HERE After a few coat of paint a little distressing on the corners and drawers.....here she is..... What do you think? Matches my  Grandmas Old Drawers  that i refurbished.  If you have time, feel free to check them out. Feel free to Visit the Blog | Follow on Pinterest | Follow on Facebook ...

Decoupage Rocking Chair

Image
What a busy month, birthdays, birthdays and birthdays. Eaten so much birthday cake i think i am going to pop. So to work off those unwanted calories i decided that some decoupage was in order... any excuse... I forgot to take a photo of the before but it was a basic wooden chair like the one below I painted the chair with my  Homemade chalk paint , i decided a lovely sky blue would look great with the paper that i had chosen. Next I cut the paper up in to assorted sizes and shaped, and decoupaged onto the seat and the head rest. then coated the paper with an extra coat of pvc glue, let it dry. Cheap trick: I used simple cheap PVC glue £1.00 for a large bottle.  Its just as good as mod-podge, only a whole lot cheaper. I put a couple of coats of varnish on to protect the paper, let to dry... and added the obligatory cushions :) Feel free to Visit the Blog | Follow on Pinterest | Follow on Facebook |  Follow...

Grandmas old drawers: A shabby chic refurb and Linky Party

Image
When my Mother-In-Law was having work done in her house, she was about to throw out a old piece of furniture which had been her mothers.   My husband (as trained by me) said that we would take them, as he was sure that I could do something with them.. It was obvious that they had been refurbished many many years go, and the flaking paint, believe it or not gave me inspiration. So i stripped it all with a wall paper scraper.  This was so much easier than i had anticipated. There were still a a few buts that i needed to sand down.  I really liked the wood, but it would not go in my living room, as it was far too dark... So...... I repainted it .... with my homemade chalk paint see recipe here I decided to leave the top wood and waxed it.... What to you think? Feel free to Visit the Blog | Follow on Pinterest | Follow on Facebook |  Follow on Twitter |Follow on Instagram Subscribe to Pretty Shabby UK ...

How to make your own chalk paint recipe

Image
I love this Plaster of Paris recipe for Chalk paint. Plaster of Paris Recipe 3 parts Paint 1 part Plaster of Paris Water to mix I made a smooth paste with the plaster of paris and water before mixing it into the paint. When mixed well, it was silky smooth and applied just as nicely as brand name chalk paint. The second day it did thicken a little and appeared a little grainy, but after mixing it thoroughly it was fine. The left over paint was stored in a glass jar to be used again. Plaster of Paris Chalk Paint Cost - £3.40 for a 1.5kg pack which will last for a long time, plus the cost of the emulsion paint.. but if you are like me you will have quite a hoard from the sales and samples. Time Involved - Easy to find Plaster of Paris on-line or at any Tesco , Range , Hobbycraft or craft store. 3-5 minutes to measure and mix it thoroughly into the water and paint. Application - Brilliant! The consistency was great and it painted on like brand name chalk paint....