Posts

Showing posts from April, 2015

How to make a hanging bird bath

Image
Here's a hanging birdbath that will bring winged visitors to your backyard to enjoy a cool drink and a refreshing dip. A shallow serving bowl, nestled in the centre of a grapevine wreath, creates a naturally inviting pool in a matter of minutes.   Time: Less than an hour MATERIALS 18-inch dried grapevine wreath, with 12-inch opening Shallow, watertight bowl, such as pottery or glass, that fits inside the wreath 3 lengths medium-weight (such as 20-gauge) copper wire, each 10 feet long 3 to 4 cups small stones, as necessary SHOPPING Wreaths available at craft and floral supply stores are marked by their diameter. An 18-inch wreath has a 48-inch circumference. Choose a bowl that nestles securely inside the wreath's center opening. To ensure a snug fit, it's a good idea to have the wreath when you select the bowl. ASSEMBLY 1. Set the wreath on a flat surface. Slide one wire length under the wreath. Bring the wire up around the wreath so that the wire is ce...

Sausage Hot dog Bites - Super Quick and Super easy...

Image
My kids are super fussy when it comes to eating... They love pasta but don't like any sauce on it. One loves meat and not potato products , the other loves potato but not meat. But here is a super quick super easy recipe that they both agreed (which is not often) they loved. How  long it takes:  15 mins preparation,  5 mins cooking time. Items you’ll need: 250g quick-cook spaghetti 4 hot dogs each cut into 6 pieces Use vegetarian sausages if required Step 1 Pour boiled water into a large pan. Place on the hob and bring water to the boil again. Thread 5-7 spaghetti strands through each hot dog piece. Step 2 Put the hot dog spaghetti bites in the boiling water. Cook the pasta (around 5 min for quick-cook spaghetti). Step 3 Drain and serve, then enjoy! Feel free to Visit the Blog | Follow on Pinterest | Follow on Facebook |  Follow on Twitter |Follow on Instagram    Subscribe to Pretty Shabby UK

Painted Toadstool Plant Pot Tutorial

Image
I am so pleased with the way my fairy houses turned out. Hope you find this tutorial useful. Materials Needed Large Terracotta  Plant Pot Large Terracotta  Plant Pot Stand Small Terracotta  Plant Pot Small Terracotta  Plant Pot Stand White, Sage Green and Red Acrylic Paint Brown, Black and Red Sharpie Markers Yacht Varnish Step 1: Paint the terracotta white.  I left the top of the pots terracotta to allow me to glue directly on to the pot, rather than the paint. Step 2: On the small terracotta pot, i drew a door and windows.  To make the door look like a wooden door, i drew from the top of the door to the bottom in lines, i like the effect it created and added little black hinges and a door knob.  As they were going outside i did not want to stick on embellishments due the British weather being rainy, rainy with a tad more rain :) ps. Make sure that the pot is upside down so that the large part is at the...

Happy St George's Day

Image
Introduction Saint George's Day is 23 April. Saint George Saint George, by Gustave Moreau © Saint George is the patron saint of England. He's popularly identified with England and English ideals of honour, bravery and gallantry - but actually he wasn't English at all. Very little, if anything, is known about the real Saint George. Pope Gelasius said that George is one of the saints "whose names are rightly reverenced among us, but whose actions are known only to God." Facts in brief Everything about Saint George is dubious, so the information below should be taken as mythical rather than real.  Born in Cappadocia, an area which is now in Turkey  Lived in 3rd century AD  His parents were Christian  Later lived in Palestine  Became a Roman soldier  Protested against Rome's persecution of Christians  Imprisoned and tortured, but stayed true to his faith  Beheaded at Lydda in Palestine  23rd April was named a...

Froggie Baseball Cap

Image
Kids will love making and wearing this Froggie Baseball Cap from  Amanda   Great for a day out playing in the mud, rain, or exploring the local forest preserve, this cute frog hat is great for boys and girls!   Materials: Green baseball hat Acrylic paint: black, white, spring green, foliage green Textile medium Round stencil sponges Black Sharpie marker Toothpick 3″x1″ piece of red felt Instant grab glue Instructions: The textile medium will turn your acrylic paint into fabric paint. So if you ever need to wash your hat, you can. However, keep in mind that the tongue probably won’t survive and you may need to create a new one should the need arise to launder it. To mix, use one part texile medium and 2 parts paint.   Dip large round applicator in foliage green paint and gently scrape off excess. Press applicator onto hat above the bill, gently turn the applicator in a circular motion to make the circle larger. Do this on both sides for ...

Soldered Glass Earrings

Image
Learn how to make earrings that look boutique-bought with this project for soldered glass earrings from  Suzann Sladcik Wilson . Glass tiles and scrapbook paper have never looked better than with these dainty black-and-white pendants. Try all sorts of patterns and pictures - the possibilities are endless! Materials: Scrapbook paper – Me & My Big Ideas textured card stock Sharpie pen 4 – 1″ glass squares  Scissors Copper foil tape – 1/4″ wide Bone Folder Lead Free Solder Soldering Iron Paint Brush Liquid gel Flux Tweezers Leverback Earring Findings – 1 pair Third hand 4 – 5mm Sterling Silver Jump Rings Pledge Multi-Surface spray Paper towels   Instructions: Take a 1-inch glass slide and place on area of scrapbook paper you would like to have as your image. Trace around glass slide with Sharpie and cut out image.   Place image between two pieces of glass. Make sure there are no fingerprints on the inside of the glass. Trim any edges...

Grandmas old drawers: A shabby chic refurb and Linky Party

Image
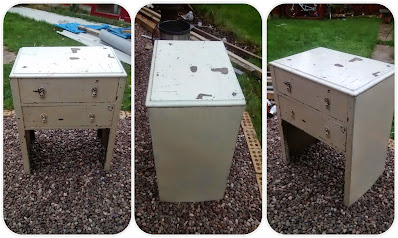
When my Mother-In-Law was having work done in her house, she was about to throw out a old piece of furniture which had been her mothers.   My husband (as trained by me) said that we would take them, as he was sure that I could do something with them.. It was obvious that they had been refurbished many many years go, and the flaking paint, believe it or not gave me inspiration. So i stripped it all with a wall paper scraper.  This was so much easier than i had anticipated. There were still a a few buts that i needed to sand down.  I really liked the wood, but it would not go in my living room, as it was far too dark... So...... I repainted it .... with my homemade chalk paint see recipe here I decided to leave the top wood and waxed it.... What to you think? Feel free to Visit the Blog | Follow on Pinterest | Follow on Facebook |  Follow on Twitter |Follow on Instagram Subscribe to Pretty Shabby UK ...

How to make your own chalk paint recipe

Image
I love this Plaster of Paris recipe for Chalk paint. Plaster of Paris Recipe 3 parts Paint 1 part Plaster of Paris Water to mix I made a smooth paste with the plaster of paris and water before mixing it into the paint. When mixed well, it was silky smooth and applied just as nicely as brand name chalk paint. The second day it did thicken a little and appeared a little grainy, but after mixing it thoroughly it was fine. The left over paint was stored in a glass jar to be used again. Plaster of Paris Chalk Paint Cost - £3.40 for a 1.5kg pack which will last for a long time, plus the cost of the emulsion paint.. but if you are like me you will have quite a hoard from the sales and samples. Time Involved - Easy to find Plaster of Paris on-line or at any Tesco , Range , Hobbycraft or craft store. 3-5 minutes to measure and mix it thoroughly into the water and paint. Application - Brilliant! The consistency was great and it painted on like brand name chalk paint....