Posts

Showing posts with the label wreath

Raffia and Paper Bag Halloween Wreath

Image
Recycle a brown to create the shapes for this fun Halloween wreath designed by  Heidi,  A bit of paint, raffia and a straw wreath make this a quick, easy and inexpensive Halloween craft.   This quick and easy Halloween craft is a welcoming, festive sight on the door. Your visitors will love how this Halloween wreath craft looks (and the witches and goblins will love it, too). Materials: Tacky Glue Brown grocery bags 3” square cardboard (or plastic) squeegee Acrylic paint: black, orange, white, yellow, green Paintbrushes – 1/2” flat, 1/2” flat, fine-tip Natural raffia Scissors 12” diameter straw wreath Halloween Patterns For Full instructions please visit:  Favecrafts Amazing design by  Heidi Borchers of Inspired at Home . Feel free to Visit the Blog | Follow on Pinterest | Follow on Facebook | Follow on Twitter |Follow on Instagram Subscribe to Pretty Shabby UK
Halloween Wreath

Image
With an old black trash bag and some general craft supplies, you can create this Bin bag  Halloween Wreath in no time.  This is a great way to add some Halloween charm to your outdoor  décor .  Too late for Halloween?  Use a white trash bag and embellish your wreath with ornaments or flowers to make a beautiful winter or spring wreath that you'll be proud to show off!   Materials: 2  black plastic bin bags Clear .75” round hose, alternatively use  insulation pipe wreath Scissors Craft knife Tape Fringing scissors Instructions: Use a craft knife to cut the hose to the length you want.  Make the ends as straight as possible. Wrap tape around the hose ends to hold them together and form a complete circle. Use a craft knife, or scissors to cut the trash bag into strips that measure 9” x 3”.  It will take a little more than one bag to cover a 12” round wreath.   Save cutting time by layering pieces w...

Top 10 Christmas Wreaths

Image
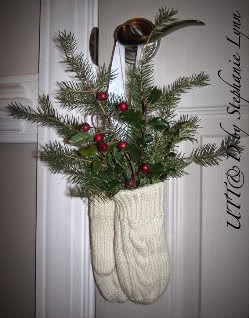
I love the way the American craft blogs show their crafts they have made in their beautiful homes.... I love to see their beautiful wreaths on their freshly painted and neat and tidy front doors.  I wish that the UK could show some of that flair when it comes to our homes and crafts. So if you are like me and obsessed with homemade crafts - i hope you like the selection of wreaths i have put together. Smitten for mittens and fresh greens Beautiful peacock wreath Pink, black and zebra print ribbon wreath Ok ....I know this is not christmassy - but i just love it.  Really simple to make click  here  for the tutorial stocking wreath Organic and traditional Orange and cinnamon wreath Amazing red rose wreath Pinecones and lavendar Cute little rag ribbon wreath Christmas mesh wreath Feel free to Visit the Blog | Follow on Pinterest | Follow on Facebook | ...

Red white and Blue Ribbon Wreath

Image
After making my craft room wreath  i was inspired and decided that i needed to make more. I have recently decorated my bathroom, so i thought what better room to do it for. I love the vintage union jack theme at the moment. I created this wreath the using the same technique as i did the Pink, Black and Zebra Print one I had plenty of red, blue and white ribbon in my stash to use. My two beauties, both made within a night. (my door is actually white, even though it looks a yucky cream...honest)

Pink and Black and Zebra Print Ribbon Wreath

Image
As promised, Here is my Pink, Black and Zebra Print Ribbon Wreath. This is the one I will be using in my craft room. Firstly make your wreath base – For a super frugal idea, why not see my insulation pipe tutorial. Then cut all of the ribbon into 4 1/2" strips. This is the most time consuming part of the entire thing. Fold a piece of ribbon and form a loop. (overlap the ends by about 1/2"). Place a pin through the ribbon, from the inside out, to hold ends together. If your ribbon is one sided, make sure that your design is on the outside. Then, simply just attach the ribbons to the wreath base by pushing the pins in all the way. Make sure that the loops are close enough together that no base shows through. And you just keep going until your wreath is full. I started with just one ribbon and randomly put it in throughout. I think it helped to make sure that I didn't have too much of any one ribbon i...

How to make an Insulation Pipe Wreath Tutorial

Image
After making my Christmas wreath, I'm really getting into wreath making.  After looking for wreath bases I came across a fabulous idea on Pinterest to use pipe insulation for the wreath form.  How fabulous is that??  Luckily my husband had some, as I am still doing my £0.00 challenge, which he uses for covering his fishing lure hooks.  He buys them at B & Q hardware store, the insulation is under £1.00 for a length. This project is so simple to do.  All you have to do is bend the pipe insulation to the wreath size you want and then just duct tape the ends together. How cool is that?  I think that this works better with bigger wreaths, as the pipe insulation does not really stay in a good circle on the smaller wreath forms. I decided to make the wreath a little stronger by taping it with electrical tape. There are so many wreaths that you can make. If you like this idea why not see how I made...