Posts

Showing posts from 2012

Pinecone Carollers

Image
These small-scale singers are poised to echo their joyous strains this holiday season. Total Time Needed: 1 Hour Materials Acrylic paints Capped acorns Hot glue 2 small twigs Small pinecone, between 1" and 2" tall Glue stick Small piece of photocopied sheet music Coloured construction paper Instructions To make your own tiny choir, first use acrylic paints to create faces on a collection of capped acorns and allow them to dry. Use hot glue to secure each acorn head and 2 twig arms to a small pinecone (ours were between 1 and 2 inches tall). For each songbook, use a glue stick to attach a small piece of photocopied sheet music to a rectangle of coloured construction paper. Give each book a centre crease, and then attach the music to the carollers’ hands with hot glue. If you enjoyed this craft, why not check out the  pinecone topiary tree Photo courtesy of Family Fun

Glass Pebble Baubles - Tutorial

Image
Here is a simple way to make a plain Christmas bauble into something special with round glass pebbles. These pebbles are normally available in small bags at discount or craft stores. The string used to hang the baubles will need to be replaced with fishing line, as the pebbles make the bauble considerably heavier.

Amazing Mrs Claus Apron - Tutorial

Image
Does the thought of preparing Christmas lunch bored you?  Well try serving it in this easy to make little Christmas number. The Mrs Claus Apron is so simple to make, and you have to admit, it is so cute too. Dont forget to pop over an have a look at the adorable  Pinecone carollers  or my  Top 10 christmas wreaths

Easy to Make Christmas decorations

Image
Wow how quickly this weekend has gone, i have been busy making Christmas decorations for our tree.  I love traditional style Christmas trees.  My plan is to have a handmade red and wooden decorated Christmas tree this year. All the decorations  were so easy and so much fun to make. Stuffed Christmas pudding: made of felt, sequinnes, wadding and jute.    Gingham felt and Heart hangers:  Using felt, gingham, sequins, beads and jute Wooden Dotty Hearts: I used some wooden hearts from my stash -  painted them red with white dots, gingham ribbon sequins and jute. Gingerbread men: used these from my stash, painted them brown with white stitches, square of hessian, jute and red button.  I made these last year but slightly different. Santa Balls: I used glitter baubles, silver card and black ribbon. Reindeer thumbprint baubles: Luke and Chloe's thumbprints were turned into reindeers. ...

Top 10 Christmas Wreaths

Image
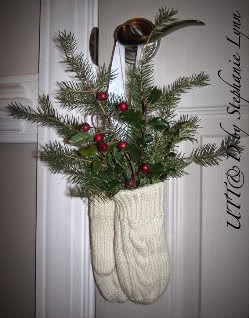
I love the way the American craft blogs show their crafts they have made in their beautiful homes.... I love to see their beautiful wreaths on their freshly painted and neat and tidy front doors.  I wish that the UK could show some of that flair when it comes to our homes and crafts. So if you are like me and obsessed with homemade crafts - i hope you like the selection of wreaths i have put together. Smitten for mittens and fresh greens Beautiful peacock wreath Pink, black and zebra print ribbon wreath Ok ....I know this is not christmassy - but i just love it.  Really simple to make click  here  for the tutorial stocking wreath Organic and traditional Orange and cinnamon wreath Amazing red rose wreath Pinecones and lavendar Cute little rag ribbon wreath Christmas mesh wreath Feel free to Visit the Blog | Follow on Pinterest | Follow on Facebook | ...

Owl party bags made from paper bags

Image
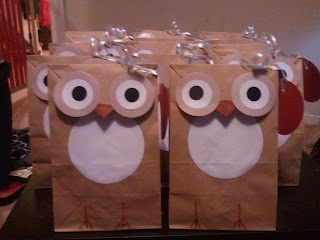
 My son Luke's birthday is on the 14th November, so i decided to gt his party bags ready whilst i had a spare moment....low-and-behold i could not find them, we bought some standard plastic one, which are available in most stores. I needed a back up plan, well where do I turn??? to my stash of course.  I bought brown paper bags with the intention of making a paper bag scrap album...but did not get round to it., thank goodness..... After perusing  Pinterest  I thought I would make some paper bag owls. Materials Brown paper bags White paper Black paper Brown paper Nestibles circle die-cuts Orange Sharpies marker Method Using the nestibles circle die cuts I cut out black circles, using the smallest circle, white next smallest and brown next size up and finally white circles the largest size die. Next i glued the white to the brown, then the black to the white to create the owls eyes. Fold the top of the paper...

Handmade Christmas Decoration - Five fingers snowman ornament

Image
Well guys, its coming to that time of year........yes....christmas craft making time. The kids and i had these Five fingers snowman ornament, which i originally found on  Full of great ideas , there is a wonderful step-by-step pictured tutorial. My version Love the way the white contrasts with the red bauble I made 6 of these in total Surprised at how good it looks I did not think i would like the silver baubles, so i used these as my practice ones, but i really like them, i am surprised that they look so good. Not only do we have keepsakes for this year, but we have started a tradition, as each year i plan to make more with the kids to see how they have grown. I made 6 of these baubles - Luke did 3 and Chloe did 3, so we are going to keep a set, and the other sets will be given to my parents and parents-in-law. The kids enjoyed this activity so much.  I would recommend that you try this......

Tutorial: Make a Jenga Block Keychain

Image
Tutorial: Make a Jenga Block Keychain  Follow this easy tutorial to make one of these great keychains, which you can personalize with your own images. Materials: Old Jenga Blocks or other similar sized pieces of scrap wood sanded smooth Papers/Images or your choice Cording for knot at top 1 Keychain ring per keychain Drill bit (similar width to the cording), and drill Glue Woodburning tool Sharp scissors Sharp pointy object like an awl (I use a metal cake tester) X-acto knife (optional) Some kind of sealant, I used a glossy, quick dry, polyurethane First drill a hole in the block (approx 1/2" from the top). Drill straight through till the bit comes out the other side of the block. Be sure to do your drilling on a scrap piece of wood. Next, take some glue and spread it lightly on one side of the block. Place the block (the glue side) on your paper or image. You can hold the paper up to the window or other light source to see through the paper to find the best placem...