Posts

Showing posts from June, 2022

Showers of Love

Image
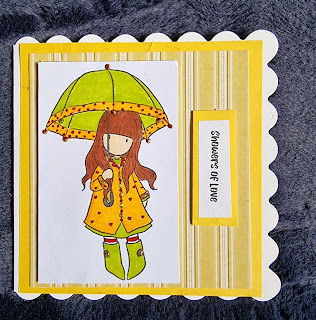
Good Morning All,  If your in the UK this morning, you will be able appreciate this card this morning.  For those who aren't let me tell you, it is torrential rain, and its so dark that it looks like evening time. So, showers of love seemed so apt for today's card. What you will need:- 6" x 6" card blank 5 3/4" x 5 3/4" yellow card stock 5 1/2" x 51/2" yellow and white striped designer paper (from stash) Santoro - Stamp "Puddle of Love" Decotime - Aqua Markers White Card stock Cut to size. I have shared with the following:- Color Throwdown - CTD#698 My Favourite Things I hope you enjoyed the card today.  Let me know what you think in the comments below. Feel free to Visit the Blog | Follow on Pinterest | Follow on Facebook |  Follow on Twitter |Follow on Instagram Subscribe to Pretty Shabby UK

Origami Shadow Box Fold Card Tutorial

Image
Hi, I hope you are all well. I was looking for an unusual card to do for my turn at card class.  I came across this card.  Its another very simple and easy to make card, but i think it looks very effective. 1         Cut the paper to the following sizes: Plain Lilac Paper – 5 ½” x 5 ½”          Single Side Spotty Paper – 5 ¼” x 5 ¼ “ Single sided Flower Pattern – 5” x 5” Double sided Flower Paper – 5 ¼” x 5 ¼” 2           Mat and layer the papers, 1 st Plain, 2 nd Spotty and 3 rd Floral single sided. 3           Using the double-sided piece – (floral side up), mark the centre of the paper. 4           Fold the corner points to touch the centre point, so there should only be the spotty paper seen.  5           Once all the corners have been folded in, fold back each point to the edge of the outer fold. 6           Adhere the sentiment. 7          A dhere the frame onto the card 8           Colour and decoupage the flower and adhere on to the frame.   Hope

Feathered With Sympathy Card

Image
I very rarely get to make sympathy cards, but when I saw this feather stamp, which came free with the latest edition of simply card and papercraft, I knew I had to make one. It's one of those cards that are very simple to make, but very effective. I used: Black card Gold card Fabulous Feathers Stamps (simply papercraft and card making freebie) Double sided sticky tape 3d foam tape Gold heat embossing power Embossing ink pad Heat gun First I cut a 5x7" card base from the black card, then cut a piece of gold cardstock that measured 4 1/2 x 6 1/2" and adhered itfor a mat. I cut a piece of black card 4 x 6# and stamped the feather design, I made sure that the feather went in different directions and some over hung the page, it gives a fluttering effect, heat seat the embossing powder. Adhere that to the gold card. I then stamped a piece of black card with the sentiment With Sympathy and heat embossed it, mounted onto a piece of gold card and attached to the card. Voila, si

Cardmaking Templates

Image
Cardmaking Templates Creating a particular cardmaking template can help you to make some really stunning cards plus it will serve as a reminder for you when you need to make it again. Not only do templates help you to see the required measurements but it allows you to build up your confidence as you make them. They don't need to be fancy and you don't need to be able to draw either (phew, because I am really really bad at drawing).  So give it a try, I promise you it will be worth it. Tips Use some of your old scraps or card, if your like me, there will be loads knocking around Make all your lines and instructions clear and bold, so that you will see what you need to follow Store them safely in a folder to be re-used again and again whenever you need them.  I find this particularly useful if it has been some time since I did a project, and need a little refresher on what to do.     This beautiful Japanese Dream Bridge Card   has been created using a template I