Laundry Sack Tutorial
To be truthful, laundry is one of my least favourite things to do. There is not much you can do to make the chore fun. Although there is nothing you can do to make the laundry more pleasurable, you can however use a lovely laundry sack to store your clothes that are waiting their turn for the washer and dryer.

The finished sack measures approximately 21" X 23"
and it holds one person's laundry for the whole week. But, if you are anything
like me its about 2 days laundry. My
kids just attract dirt.
This bag is not only adorable, but it is handy if you are lacking
space for a hamper. You can also tote this on vacation to hold all of your
dirty clothes.

The first step is to gather all of your supplies. Whilst most of my projects are spur of the
moment, I used to find my self running round like a blue bottomed fly getting
the bits I had forgotten initially.
Picking fabric is part of this step, so have fun and find
something eye-catching and colourful!
Here is what you need:
***2 pieces of fabric measuring 24" X 42" (see
note below)
***60" of drawstring or cord
***7" length of one-inch wide webbing
***All of the basic like scissors, thread, a fabric marking pen, pins and, of course, a sewing machine.
***60" of drawstring or cord
***7" length of one-inch wide webbing
***All of the basic like scissors, thread, a fabric marking pen, pins and, of course, a sewing machine.
24" by 42" inches is equal to 2/3 yard of fabric.
On my outside piece, I opted to sew two fabrics together in order to make this
bag more colourful. I cut one piece (the stripes) 8" X 42" and
another piece (the green floral) 17" X 42. The next two steps will show
you how to proceed from here. If you are not sewing the two pieces together to
make the outside piece for your bag, proceed to step "d".

Sew your two outside fabrics (the stripes and the green floral) together using a 1/4" seam. The fabrics should be right-sides together.

At this point you will need to lay your inside fabric piece
against your outside fabric piece (the two fabrics you just sewed together) to
see if they are the same size. I ended up having to cut about 1/4" off the
bottom of my outside piece. Feel free to cut a little fabric off to make your
pieces match up.

Fold your fabric in half lengthwise. On the un-sewn edge by
the top of the bag, you will need to mark an area (with your fabric marking
pen) where you will not sew. As you can see in the photo, you will mark
1-1/4" from the top edge and 2-1/4" from the top edge. This will be
your casing for your drawstring.
Do this on both the inside piece and the outside piece of
fabric.

Now you are going to sew the side edge and bottom edge of
your bag using a 5/8" seam. You can see in the photo where your markings
indicate a place where there is no seam.
Also, leave a 4-5" opening on the bottom of the inside
fabric piece for turning.

Iron your seam open. You should have a small opening in your
seam

Draw a line (using your fabric marking pen) around your
opening. You will sew along this line. This will keep the fabric from coming
out of the drawstring opening when you pull on the drawstring.

This is what your line casing opening should look like after
you sew around your marked line.
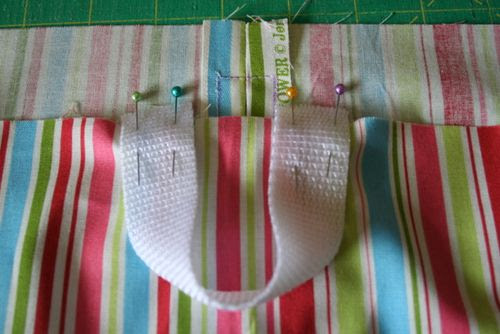
Now, you are going to attach your webbing to the outside
fabric piece. You will pin it on the opposite side of the fabric from where
your casing opening is.
Allow about 1/4" of webbing to stick up over the top
edge of your fabric.
If you are unsure of where to place the webbing, see the
next photo.

In the photo the drawstring casing is on the right and the
webbing is on the left. Make sure your webbing is in the right spot.

Sew the webbing onto the fabric piece using a 1/4" seam

This is how your webbing piece should look after it is sewn
onto the fabric.

Now turn your outside piece of fabric right-side out, and
the inside fabric piece should be inside-out. Both of the drawstring casings
should be facing the same direction.

You will put the inside piece into the outside piece (again,
make sure that your casings are on the same side).

Pin the top edge together all the way around.

You should be able to open up your casing as shown in the
photo. If you can't, you need to try repositioning your fabrics.

Sew around the top edge of your bag, using a 1/4" seam.

Now you will pull the bag through the 4-5" opening
along the bottom edge of your fabric. If you forgot to leave the opening (I do
that all the time!) just use a seam ripper to open one up.

Arrange your bag, tucking the inside where it belongs.

Pin all along the top edge of the bag.

To form the casing you will need to sew a seam all around
the top edge of your bag. Line up this seam with the top of the sewn line that
goes around your casing. Then do the same thing on the bottom line.

Your casing should look like this.

Tie a knot on each end of your drawstring (this keeps it
from fraying). Put a safety pin through one of the knots.

Thread the drawstring through the casing.

And Voila.....You are done! All you need to do now is to find a place to
hang your bag. Oh, you might want to get some clothes dirty too!
Excellent tutorial by Randi


A great tutorial, many thanks. Lovely material. 'Doing' the laundry is a pain, so really nice to have something pretty to hide hide it away in. Hope you have a good week.
ReplyDeleteI love your choice of fabrics - it makes for a really lovely finished bag! x
ReplyDeleteGood idea for using on holiday, and so lovely it almost makes doing laundry seem okay!
ReplyDeleteLove this idea. I should make one for each member of my family but for now it needs to go on the to-do list :)
ReplyDeleteI really like the contrasting yet coordinating fabrics you chose! Thanks for linking up at the Friday Shout Out!!
ReplyDelete